Syntax got your tongue? I've compiled 13 JMP Scripting Language tips that I've found handy while learning JSL syntax:
1. Concatenating strings (see Craige Hales' post on this)
places = {"world", "planet", "globe", "Earth"};statement = "Hello " || places[2] || "!";
The above code creates the string "Hello planet!"
2. Referring to table column names that have special characters
Let's say your table, dt, has a column named "Prob(Pred)" (probability of prediction). If you reference it as
dt:Prob(Pred)
it won't work. You need to use quotes:
dt:"Prob(Pred)"
3. Referencing a particular file in addin (see PMroz's original solution)
To work with a file contained within your jmpaddin, you should refer to your file as:
"$ADDIN_HOME(com.mycompany.test_addin)\myfile.jmp"
4. Changing Text Box font color, size and type
myText = Text Box(statement, < (To center the text in the window, you'll need to add Spacer Boxes on either side of the text in a H List Box -- see tip #12.)
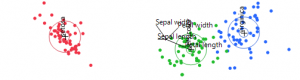
5. Saving a graph/plot in a report as an image (sample data (iris) also seen on discriminant analysis report page)
First, use the point-and-click interface and generate the model you want. After this, click the little red triangle, go to script > Save Script to Script Window. Don't close your model window yet.
In the new script window, assign the model a name; for example, I can name my discriminant plot discrimGraph:
discrimGraph = Discriminant([...generated code...]);
Make this generated model a report:
report = discrimGraph << report;
Go back to your model window, right-click on the graph or figure you want to save, and go to Edit > Show Tree Structure. This will tell you the name of the object you want to grab (often, the HelpKey will guide you to the right box). Here, I want to grab a Frame Box:
reportBox = report[Frame Box(1)];
Finally, if you want to convert reportBox into an image that you can save:
modelImage = reportBox << getPicture();
You now have a variable name attached to the specific graph or plot that you've generated. If you want to save this as an image to your computer:
modelImage << Save Image("C:\Documents\JMP\myImage.png", png);
Often, PNG images look better, but are larger files.
6. Deselecting all rows in a data table
This one is pretty straightforward; select all rows, and invert the selection. This won't affect row markers.
dt << select all rows;dt << invert row selection;
7. Building a user interface in JMP -- resizing windows
If you want to resize a window to particular dimensions in pixels (note: this includes the outer frame of the window, not just its contents):
win << Set Window Size(width, height);
8. Setting the background color for a graph or plot
I often needed my white-background plots to blend in with the default gray of the display box:
myGraph[framebox(1)] << Set Background Color({0.97255, 0.97255, 0.97255});
The order for the three arguments is R, G, B; remember to convert your desired RGB values from a 0 - 255 scale to a 0 - 1 scale (divide desired value by 255).
9. Discriminant analysis -- removing biplot rays for clarity
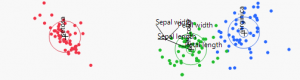
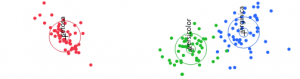
In the point-and-click interface of your model, go to the little red triangle > Canonical Options > Show Biplot Rays. If you want the script for removing the biplot rays, now go to script > Save Script to Script Window, and you'll see the argument that makes this change is
...
Show Biplot Rays( 0 ),
...
10. Building a user interface in JMP -- changing Spacer Box size
Where the first argument is horizontal size, and the second argument is vertical size (both in pixels):
SpacerBox(Size(h, v))
11. Building a user interface in JMP -- auto-resizing spacers
Spacers can auto-adapt in one direction (when window contents change) if you leave out one of the arguments:
SpacerBox(Size(, 1))
12. Building a user interface in JMP -- justifying all boxes in a display tree window
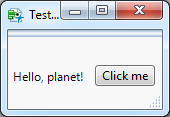
Line Up Box() is your friend. You can use it to align all the given boxes within it:
...
Line Up Box(
H List Box(Align("center"),
SpacerBox(),
Text Box("Hello, planet!"),
SpacerBox()
),
H List Box(Align("center"),
SpacerBox(),
Button Box("Click me", afterClick()),
SpacerBox()
)
),
...
13. Scaling/resizing, cropping images
This scales down the image by 50 percent in both dimensions:
myImage << scale(0.5);
This crops the image to the dimensions you want (in pixels):
myImage << crop(left(startingColumn), right(endingColumn), top(startingRow), bottom(endingRow));
I hope these 13 tips will be as lucky for you as they have been for me!
Here are some additional resources that I found very helpful:
Manipulating Displays, Displays, Display Boxes, and Display Trees
JMP Scripting Guide
Rows and Row States
Character Functions
One-page JMP Guides
Online JMP Scripting Guide IndexOne more thing: I'll be presenting a poster at Discovery Summit, so if you have a chance, please stop by!
@RBILLC, you can use mouse box to create your own button, where you can control the font size. See Example below.
Custom Button = Function({text,callbackExpr=Expr(),textSize=0},
 margin = Max( 5, textSize / 2 ); // guestimate a good left/right margin based on the font size
 Eval(
  Eval Expr( // to eval the callback expression
   Border Box( left( 2 ), right( 2 ), top( 2 ), bottom( 2 ), // spacing around the button
    Mouse Box(
     Border Box( left( margin ), right( margin ), top(2),bottom(2), Sides( 15 ),
      Text Box( text, <<SET font="" size=""></SET>
Here's a GIF of it in action:

@David_Burnham, a Spacer Box with no arguments is configured as a stretchable spacer, with initial size=1, min=0, max=30000. This box will grow and shrink with the window size:
SpacerBox()
When a non-zero size is specified, the spacer has fixed size, with size=min=max:
SpacerBox(Size(h,v))
Tip 11 is pointing out that you can mix the behaviors by omitting one of h or v. You can also get the same behavior by passing -1 for the missing argument.
